Your wheels are probably the hardest part of your car to safely clean and protect, as they are subject to continuous contamination by brake dust and road grime. Brake dust is a major problem for owners of cars with alloy wheels, as it is corrosive, unsightly and difficult to remove. Brake dust is the product of friction between brake discs and brake pads. When braking, the surface of brake pads are worn way, producing dust that is deposited on other surfaces nearby, i.e. your rims. The compounds used to make brake pads vary greatly in hardness and metal content, meaning that the amount of brake dust generated can vary significantly between cars.
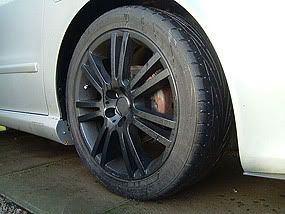
Brake dust is actually a combination of carbon fibres, metal filings and adhesive residues. It is often deposited on rims at very high temperatures, meaning that it immediately etches into any protective coating. The adhesive residues in brake dust not only cause it to firmly bond to everything it touches, but also initiate corrosion in their own right, as they are often acidic. If that wasn't bad enough, the metal filings contained in brake dust have a tendency to oxidise, and if they do this when in contact with the metal of the rim the process of galvanic corrosion sets in. Thus, brake dust gradually erodes protective coatings until they fail, after which point the rim itself starts to corrode. This gradual erosion not only makes the rim look unsightly, but can also eventually affect the structural integrity of the wheel.
There are three ways to control brake dust. The first is to fit aftermarket low dust brake pads. Both kevlar-based compounds and high metal content compounds are effective in this respect. The second option is to fit dust shields, which can now be bought for most types of cars. These sit between the rim and the hub, and shield the rim from the caliper assembly whilst still allowing ventilation. The downside of such devices is that they look unsightly and aren't suitable for performance cars where high levels of ventilation are required. The third option is to detail your wheels properly. An easy thing to say, but what does this actually mean? In our experience, if you want to keep your wheels in perfect condition, it means a minimum of weekly washing and a quarterly reapplication of a wheel specific wax or sealant. Anything less and corrosion will occur, as we have found to our cost in the past.
Regular washing should be the easy bit, but is often overlooked, particularly during the winter months, when wet and windy weather often means that weekends are spent indoors and the notion of going outside to wash the car seems pointless. Believe us, it isn't. Get your coat on and give it a quick wash, and don't worry about drying everything off - just make sure you get any road salt and brake dust off. It only takes a few weeks for serious etching to set in on unprotected rims, and in the winter many weekends can pass by without a nice day. Once etching sets in you're facing a problem a bit like rust - no matter what you do it persistently gets worse.
We recommend that wheels are washed using a microfibre wash mitt and a gentle shampoo in conjunction with the two bucket method. Note that you should never attempt to wash your wheels when they are still hot from driving. This is because products will dry too quickly and leave stains, and you could also crack the discs if you cool them too quickly by hosing them down with cold water. You should start the washing process by hosing off any loose dirt and grime using a hose or a pressure washer, being careful not to knock sticky balancing weights off if you have alloy wheels. You should then scrub the tyres and rims using the wash mitt, being generous with the suds and taking the time to get into all of the nooks and crannies and remove all of the brake dust (if you continually miss some wash after wash it will become more firmly bonded, making later removal more difficult). If your wheels are particularly dirty you can also scrub them first using a soft tipped scrubbing brush. After washing all of the wheels, rinse them off with the hose and then continue the process by washing the insides of the wheel arches, rinsing the mitt regularly. Finally, rinse everything again and dry the wheels off using a heavyweight waffle weave microfibre towel.
You might be questioning at this stage whether brake dust can be successfully removed using just a wash mitt and a gentle shampoo. In our experience it is very easy to do so, providing that the wheels are regularly protected with a wheel specific wax or sealant. Such products form a barrier on the surface of the rim, staving off any corrosive effects and dramatically reducing the ability of brake dust to bond to the rim. However, such coatings are themselves eroded over time, and should be replaced every few months if adequate protection is to be maintained. If you haven't protected your rims before and you are finding that normal washing is not removing all of the brake dust bonded to your wheels, then you may need to use an aggressive cleaning product to solve the problem. Such products are sold en masse in many high street stores, and comprise sprays and foams that promise to remove all traces of brake dust without any effort (spray on, hose off). In our experience, many of these products do not work, and those that do are often so aggressive (acidic) that they themselves can etch rims if used on a regular basis. We therefore recommend that such products are used infrequently, and preferably only if absolutely necessary.
Once you have removed all traces of baked on brake dust it should not cause you any further problems provided you wash your wheels regularly and reapply wheel specific wax or sealant protection on a regular basis. The type of overhaul we recommend that you give your wheels on a quarterly basis is described below.
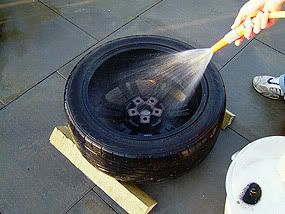
The first thing to note is that ideally you should remove the wheels from the car to work on them. This is because it is very difficult to clean and protect the rear of the rim when working with the wheel still on the car. If you only ever tend to the front face of the rim, what will eventually happen is that corrosion will spread from the rear, negating your efforts. To remove a wheel from your car you should start by parking on a level surface and ensuring that the handbrake is on (it is also advisable to chock the wheels at the opposite end of the car to the wheel you want to remove). Then using a wheel brace, loosen the wheel nuts by a couple of turns with your car still on the ground. Then jack up the car using either the jack supplied with your car or a trolley jack (the latter is preferable), consulting your manual if you are unsure about the location of the jacking points. With your car now raised, you should now place an axle stand beneath a suitable jacking point and carefully lower your car onto the stand (again consult you manual if you unsure about the location of the jacking points). Finally, remove the loosened wheel nuts and the wheel, taking care not to let the wheel fall off the hub (also remember to put the wheel nuts in a safe place where they will not be lost or damaged).
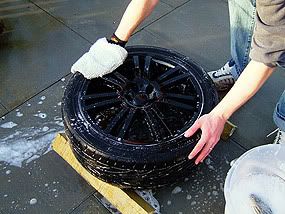
When working with the wheel off the car, you should be careful not to let it fall over or rest with the front face on the ground, as this could easily cause damage. When we work on our own wheels we use two short lengths of timber to raise each wheel off the ground when working on either face. The first step in the actual cleaning process is to hose off any loosely bonded surface contaminants using a hose or pressure washer, being careful not to knock any sticky balancing weights off if you are working on an alloy wheel. Then you should scrub the tyre and rim using the wash mitt, being generous with the suds (it is perfectly acceptable to use either a more aggressive shampoo or an all purpose cleaner for this task) and taking the time to get into all of the nooks and crannies and remove as much contamination as possible. If the wheel is particularly dirty you can also scrub it first using a soft tipped scrubbing brush. After washing the wheel, rinse it off using a hose, and finally dry both faces using a heavyweight waffle weave microfibre towel.
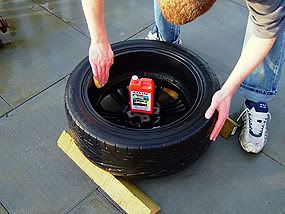
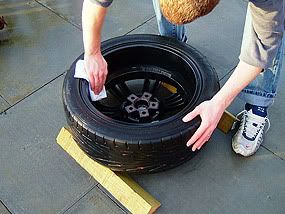
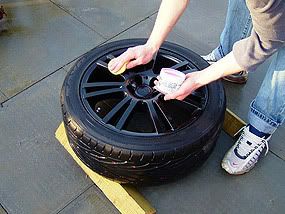
If you discover at this stage that there are still a lot of surface contaminants bonded to the rim, you can attempt to remove them using a clay bar and a lubricant (follow exactly the same procedure as when using a clay bar to clean painted surfaces - see our paint cleaning guide for details). The only downside to using a clay bar on rims is that many rims feature intricate designs, which makes using a clay bar difficult and time consuming. An alternative is to use a cleaner-wax designed to clean surfaces and lay down a layer of either wax or sealant protection in a single step. When applied using either a microfibre work towel or a microfibre pad, such products have a relatively strong polishing action that is capable of removing baked on brake dust in addition to tar spots and other bonded contaminants. Once all contaminants are removed, any residues should be buffed off using a microfibre work towel.
With the wheel now clean, the next step in the process is to protect the rim using a wheel specific wax or sealant. Such products are designed to be able to cope with higher temperatures than conventional waxes and sealants, and thus resist etching by hot brake dust. You should take care at this stage to liberally cover every square inch of the rim, and apply two or three coats of protection one after the other. Each coat should be allowed to dry to a haze and then buffed off using a clean microfibre work towel before applying the next coat.
The next step in the process is to clean and dress both sides of the tyre using a good quality water-based tyre dressing, applied using a foam applicator pad. Unlike oil-based dressings (which often contain petroleum distillates), water-based dressings are able to penetrate the rubber, meaning that they can nourish and recondition it. This not only makes the tyre look more natural, but also ensures that that the tyre is kept in better condition, as UV protectants can be carried into the tyre wall rather than remaining on the surface where they are easily washed off. Moreover, because water-based dressings soak in, they are unlikely to sling any residue up the sides of your car when you first drive it after refitting the wheels (the same cannot be said of some oil-based dressings).
The penultimate step in the process is optional, but in our opinion worthwhile - it only takes an extra 30 minutes per wheel to thoroughly clean the inside of the wheel arch before refitting the wheel. Keeping the wheel arches relatively clean enables mechanics to inspect and repair suspension and braking systems more easily. In addition, keeping the wheel arches free from heavy accumulations of dirt and grime helps keep moisture levels down, which in turn may help to prevent the onset of corrosion (we were genuinely surprised on one occasion when we replaced an arch liner after a long spell of dry weather to find a lot of sodden muck stuck behind it). The first thing you should do to clean the inside of a wheel arch is hose off any loose dirt and grime using a hose or a pressure washer (the latter is preferable). All of the surfaces should then be liberally sprayed with a degreaser, which should then be left to work for 10-15 minutes. During this interval is it a good idea to agitate the surfaces with a soft bristled scrubbing brush, as this will help loosen stubborn deposits. On a hot day you should leave less time, as you should not allow the degreaser to dry on any parts, as it will cause stains.
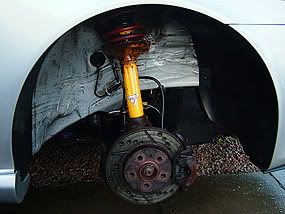
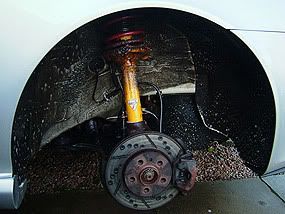
After waiting 10-15 minutes, the next thing you should do is rinse off all of the surfaces using a hose or a pressure washer. You should then inspect all of the surfaces and if necessary repeat the degreasing process. Once all of the surfaces are as clean as possible, you should dry them off using microfibre work towels. Plastic arch liners can then be restored to as new condition using a trim restorer or a good quality surface dressing, applied using either a foam pad or a microfibre pad. Painted surfaces within wheel arches are often quite textured, making them difficult to work on, but you may be able to apply a cleaner-wax or spray wax without too much difficulty. When you are finished, you should carefully refit the wheel (we recommend applying copper grease to the thread of each wheel nut first), tighten the wheels nuts by hand, raise your car up a little, remove the axle stand and then finally lower your car to the ground. Once safely on the ground, you should tighten the wheel nuts using a torque wrench, consulting your manual if you are unsure about the correct torque setting to use.
The final step in the cleaning process is to pack away all of the tools you have used, making sure everything is clean and ready for the next use. All towels and applicator pads should be washed in a washing machine at a low temperature using a gentle non-biological liquid detergent (avoid soap powders and detergents containing bleach or fabric softeners), before allowing everything to dry out naturally.
Brake dust is actually a combination of carbon fibres, metal filings and adhesive residues. It is often deposited on rims at very high temperatures, meaning that it immediately etches into any protective coating. The adhesive residues in brake dust not only cause it to firmly bond to everything it touches, but also initiate corrosion in their own right, as they are often acidic. If that wasn't bad enough, the metal filings contained in brake dust have a tendency to oxidise, and if they do this when in contact with the metal of the rim the process of galvanic corrosion sets in. Thus, brake dust gradually erodes protective coatings until they fail, after which point the rim itself starts to corrode. This gradual erosion not only makes the rim look unsightly, but can also eventually affect the structural integrity of the wheel.
There are three ways to control brake dust. The first is to fit aftermarket low dust brake pads. Both kevlar-based compounds and high metal content compounds are effective in this respect. The second option is to fit dust shields, which can now be bought for most types of cars. These sit between the rim and the hub, and shield the rim from the caliper assembly whilst still allowing ventilation. The downside of such devices is that they look unsightly and aren't suitable for performance cars where high levels of ventilation are required. The third option is to detail your wheels properly. An easy thing to say, but what does this actually mean? In our experience, if you want to keep your wheels in perfect condition, it means a minimum of weekly washing and a quarterly reapplication of a wheel specific wax or sealant. Anything less and corrosion will occur, as we have found to our cost in the past.
Regular washing should be the easy bit, but is often overlooked, particularly during the winter months, when wet and windy weather often means that weekends are spent indoors and the notion of going outside to wash the car seems pointless. Believe us, it isn't. Get your coat on and give it a quick wash, and don't worry about drying everything off - just make sure you get any road salt and brake dust off. It only takes a few weeks for serious etching to set in on unprotected rims, and in the winter many weekends can pass by without a nice day. Once etching sets in you're facing a problem a bit like rust - no matter what you do it persistently gets worse.
We recommend that wheels are washed using a microfibre wash mitt and a gentle shampoo in conjunction with the two bucket method. Note that you should never attempt to wash your wheels when they are still hot from driving. This is because products will dry too quickly and leave stains, and you could also crack the discs if you cool them too quickly by hosing them down with cold water. You should start the washing process by hosing off any loose dirt and grime using a hose or a pressure washer, being careful not to knock sticky balancing weights off if you have alloy wheels. You should then scrub the tyres and rims using the wash mitt, being generous with the suds and taking the time to get into all of the nooks and crannies and remove all of the brake dust (if you continually miss some wash after wash it will become more firmly bonded, making later removal more difficult). If your wheels are particularly dirty you can also scrub them first using a soft tipped scrubbing brush. After washing all of the wheels, rinse them off with the hose and then continue the process by washing the insides of the wheel arches, rinsing the mitt regularly. Finally, rinse everything again and dry the wheels off using a heavyweight waffle weave microfibre towel.
You might be questioning at this stage whether brake dust can be successfully removed using just a wash mitt and a gentle shampoo. In our experience it is very easy to do so, providing that the wheels are regularly protected with a wheel specific wax or sealant. Such products form a barrier on the surface of the rim, staving off any corrosive effects and dramatically reducing the ability of brake dust to bond to the rim. However, such coatings are themselves eroded over time, and should be replaced every few months if adequate protection is to be maintained. If you haven't protected your rims before and you are finding that normal washing is not removing all of the brake dust bonded to your wheels, then you may need to use an aggressive cleaning product to solve the problem. Such products are sold en masse in many high street stores, and comprise sprays and foams that promise to remove all traces of brake dust without any effort (spray on, hose off). In our experience, many of these products do not work, and those that do are often so aggressive (acidic) that they themselves can etch rims if used on a regular basis. We therefore recommend that such products are used infrequently, and preferably only if absolutely necessary.
Once you have removed all traces of baked on brake dust it should not cause you any further problems provided you wash your wheels regularly and reapply wheel specific wax or sealant protection on a regular basis. The type of overhaul we recommend that you give your wheels on a quarterly basis is described below.
The first thing to note is that ideally you should remove the wheels from the car to work on them. This is because it is very difficult to clean and protect the rear of the rim when working with the wheel still on the car. If you only ever tend to the front face of the rim, what will eventually happen is that corrosion will spread from the rear, negating your efforts. To remove a wheel from your car you should start by parking on a level surface and ensuring that the handbrake is on (it is also advisable to chock the wheels at the opposite end of the car to the wheel you want to remove). Then using a wheel brace, loosen the wheel nuts by a couple of turns with your car still on the ground. Then jack up the car using either the jack supplied with your car or a trolley jack (the latter is preferable), consulting your manual if you are unsure about the location of the jacking points. With your car now raised, you should now place an axle stand beneath a suitable jacking point and carefully lower your car onto the stand (again consult you manual if you unsure about the location of the jacking points). Finally, remove the loosened wheel nuts and the wheel, taking care not to let the wheel fall off the hub (also remember to put the wheel nuts in a safe place where they will not be lost or damaged).
When working with the wheel off the car, you should be careful not to let it fall over or rest with the front face on the ground, as this could easily cause damage. When we work on our own wheels we use two short lengths of timber to raise each wheel off the ground when working on either face. The first step in the actual cleaning process is to hose off any loosely bonded surface contaminants using a hose or pressure washer, being careful not to knock any sticky balancing weights off if you are working on an alloy wheel. Then you should scrub the tyre and rim using the wash mitt, being generous with the suds (it is perfectly acceptable to use either a more aggressive shampoo or an all purpose cleaner for this task) and taking the time to get into all of the nooks and crannies and remove as much contamination as possible. If the wheel is particularly dirty you can also scrub it first using a soft tipped scrubbing brush. After washing the wheel, rinse it off using a hose, and finally dry both faces using a heavyweight waffle weave microfibre towel.
If you discover at this stage that there are still a lot of surface contaminants bonded to the rim, you can attempt to remove them using a clay bar and a lubricant (follow exactly the same procedure as when using a clay bar to clean painted surfaces - see our paint cleaning guide for details). The only downside to using a clay bar on rims is that many rims feature intricate designs, which makes using a clay bar difficult and time consuming. An alternative is to use a cleaner-wax designed to clean surfaces and lay down a layer of either wax or sealant protection in a single step. When applied using either a microfibre work towel or a microfibre pad, such products have a relatively strong polishing action that is capable of removing baked on brake dust in addition to tar spots and other bonded contaminants. Once all contaminants are removed, any residues should be buffed off using a microfibre work towel.
With the wheel now clean, the next step in the process is to protect the rim using a wheel specific wax or sealant. Such products are designed to be able to cope with higher temperatures than conventional waxes and sealants, and thus resist etching by hot brake dust. You should take care at this stage to liberally cover every square inch of the rim, and apply two or three coats of protection one after the other. Each coat should be allowed to dry to a haze and then buffed off using a clean microfibre work towel before applying the next coat.
The next step in the process is to clean and dress both sides of the tyre using a good quality water-based tyre dressing, applied using a foam applicator pad. Unlike oil-based dressings (which often contain petroleum distillates), water-based dressings are able to penetrate the rubber, meaning that they can nourish and recondition it. This not only makes the tyre look more natural, but also ensures that that the tyre is kept in better condition, as UV protectants can be carried into the tyre wall rather than remaining on the surface where they are easily washed off. Moreover, because water-based dressings soak in, they are unlikely to sling any residue up the sides of your car when you first drive it after refitting the wheels (the same cannot be said of some oil-based dressings).
The penultimate step in the process is optional, but in our opinion worthwhile - it only takes an extra 30 minutes per wheel to thoroughly clean the inside of the wheel arch before refitting the wheel. Keeping the wheel arches relatively clean enables mechanics to inspect and repair suspension and braking systems more easily. In addition, keeping the wheel arches free from heavy accumulations of dirt and grime helps keep moisture levels down, which in turn may help to prevent the onset of corrosion (we were genuinely surprised on one occasion when we replaced an arch liner after a long spell of dry weather to find a lot of sodden muck stuck behind it). The first thing you should do to clean the inside of a wheel arch is hose off any loose dirt and grime using a hose or a pressure washer (the latter is preferable). All of the surfaces should then be liberally sprayed with a degreaser, which should then be left to work for 10-15 minutes. During this interval is it a good idea to agitate the surfaces with a soft bristled scrubbing brush, as this will help loosen stubborn deposits. On a hot day you should leave less time, as you should not allow the degreaser to dry on any parts, as it will cause stains.
After waiting 10-15 minutes, the next thing you should do is rinse off all of the surfaces using a hose or a pressure washer. You should then inspect all of the surfaces and if necessary repeat the degreasing process. Once all of the surfaces are as clean as possible, you should dry them off using microfibre work towels. Plastic arch liners can then be restored to as new condition using a trim restorer or a good quality surface dressing, applied using either a foam pad or a microfibre pad. Painted surfaces within wheel arches are often quite textured, making them difficult to work on, but you may be able to apply a cleaner-wax or spray wax without too much difficulty. When you are finished, you should carefully refit the wheel (we recommend applying copper grease to the thread of each wheel nut first), tighten the wheels nuts by hand, raise your car up a little, remove the axle stand and then finally lower your car to the ground. Once safely on the ground, you should tighten the wheel nuts using a torque wrench, consulting your manual if you are unsure about the correct torque setting to use.
The final step in the cleaning process is to pack away all of the tools you have used, making sure everything is clean and ready for the next use. All towels and applicator pads should be washed in a washing machine at a low temperature using a gentle non-biological liquid detergent (avoid soap powders and detergents containing bleach or fabric softeners), before allowing everything to dry out naturally.