Preparation, preparation, preparation... is the key to amazing car care results. No matter how good your last step product is, or how many coats of it you apply, you will not achieve a perfect finish unless you prepare your paint properly. Preparation usually involves two steps. In the first, firmly bonded surface contaminants are removed using a clay bar and a lubricant. In the second, sub-surface defects such as swirl marks and scratches are removed by polishing, which is a broad term for a range of processes that remove or mask defects and enhance surface gloss in preparation for the addition of protection.
The polishing step is often skipped by many car care enthusiasts. This may be because they do not fully understand what purpose it serves, or because they are not confident enough to try it, or because they believe it requires special tools. As a result, many are left dissatisfied with the appearance of their paint. In this guide, we will attempt to shed some light on the subject of polishing by (i) illustrating common sub-surface paint defects, (ii) describing the different types of polish available on the market, (iii) demonstrating how to polish paint by hand and (iv) demonstrating how to polish paint by machine.
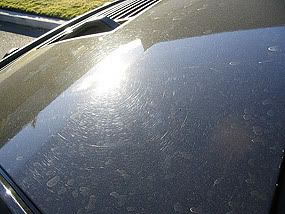
What do we mean by sub-surface defects? Sub-surface defects are any form of damage that penetrates the top layer of paint on your car, and include swirl marks, scratches, stone chips, water spots and etching caused by bug remains and bird droppings. By far the most common form of sub-surface defect are stone chips, particularly on bonnets and wings. However, many paint finishes also suffer from swirl marks and etching, and scratches are almost guaranteed if you park in supermarket car parks on a regular basis. Another less common form of defect are buffer trails, which are lines of swirl marks inflicted by poor machine polishing technique. All of the common forms of defects are shown in the images below.
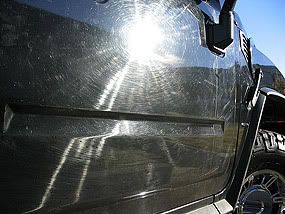
Stone chips and scratches are obvious types of defect whose cause is clear, but what about swirl marks, water spots and etching? What are they, and how are they caused? Swirl marks are circular patterns of very fine scratches that resemble the form of cobwebs (they are often referred to as cobwebbing). They are nearly always the result of poor washing technique, and are virtually guaranteed to be inflicted if you use automatic car washes (those rotating bristles aren't as soft and gentle as they look). The other classic cause of swirl marks are traditional yellow sponges, as they provide no means of lifting particles of dirt safely away from painted surfaces when they are being washed. Instead, dirt particles are held on the face of the sponge and moved around over the underlying surfaces, creating fine scratches.
Water spots may form on painted surfaces when tap water is used to rinse off suds and then left to dry off naturally. The spots themselves comprise calcium carbonate, or limescale as it is more commonly known, and other salts. If such deposits are left on painted surfaces for any significant length of time, they can harden to the point where they become difficult to remove, even by machine. In extreme cases, such deposits can attack underlying surfaces, causing etching. Etching refers to chemical erosion of the top layer of paint (more often than not a clear coat), and is also caused by the corrosive effects of organic acids in bug remains and bird droppings. Such contaminants should always be removed as quickly as possible in order to minimise the risk of etching.
Can all sub-surface defects be corrected by polishing? Sadly, the answer is no. Critical to this issue is the depth of the defect in relation to the paint system. Most modern paint systems are made up of three layers; a basecoat of primer, then a layer of flat colour, and finally a topcoat of clear lacquer, commonly referred to as the clear coat. The clear coat on many modern cars is often two to three times as thick as the underlying colour layer, and is designed to enhance the appearance of the finish as well provide protection. Most sub-surface defects usually only affect the clear coat, and can often be fully corrected by polishing. However, if the defect has penetrated the clear coat and exposed the colour layer or the primer, polishing will not help, and may even make matters worse. In these cases, your only option is a trip to the bodyshop. In our experience, most stone chip damage falls into this latter category. A good test of whether a defect can be corrected by polishing is the fingernail test; if you run your fingernail over a defect and it catches, the chances are it is too deep to be corrected by polishing alone.
How can defects be corrected? Defects in the clear coat can be corrected in one of two ways. Firstly, you can lower the level of the clear coat in the vicinity of the defect by aggressive polishing until the defect is no longer visible. In general, it is safe to remove up to 50% of the thickness of the clear coat - any more and you risk paint system failure. The benefit of this technique is that the defect is permanently removed, but the downside is that such action can compromise the integrity of the clear coat, particularly if undertaken on a regular basis. The second option is to lessen the severity of the defect by gentle polishing, and then hide or mask it before applying protection. This is undoubtedly a safer option, but the downside is that the correction is only temporary - whatever you use to fill the defect will eventually be eroded, making it visible again.
In addition to the choices given above, you also have the option to work by hand or machine. Polishing by hand is not a waste of time, although it is fair to say that it is hard work, and the results are limited. If you have any defects worse than minor swirl marks you will not remove them working by hand; the best you can hope to do is lessen their severity and then consider masking them prior to applying protection. Machine polishing opens up greater possibilities, both good and bad. Whilst it becomes possible to fully correct even quite serious defects, it equally becomes possible to remove your clear coat in a short space of time. If you go down the road of machine polishing, do your homework, follow the advice laid out below and allow sufficient time to practice and gain experience.
Now we can start to see why some people are daunted by polishing. Not only can we tackle defects in different ways, but we can also use different methods. If this level of choice wasn't bad enough, we now have to add in a third factor; that of product selection. It is no surprise that many car care enthusiasts are put off and confused by the polishing process, for there are literally dozens of different polishes available on the market, all named and marketed in different ways. However, when you look past the choice and the labels, four main categories of polish appear, and these categories are the key to really understanding polishing, as they unify all of the other options outlined above. For this reason, we will now consider these four categories of polish, namely compounds, polishes, glazes and cleaner-waxes, before moving on to look at polishing techniques in more detail.
Polishing compounds are the most aggressive type of polishes on the market, and are used to correct major paint defects, such as severe swirl marks, and restore dull, neglected paint. Polishing compounds work by physical abrasion, and should be thought of as liquid sandpaper. Many modern polishing compounds comprise uniformly sized abrasive particles that break down progressively during the polishing process. This contrasts with traditional polishing compounds, in which the abrasives did not break down at all during the polishing process, and which left surface hazing that required further polishing steps with increasingly finer abrasives until a high gloss finish was restored in readiness for protection. The benefit of modern abrasive technology is that it is now often possible to go straight from compounding to applying wax or sealant protection without the need for intervening polishing steps. In cases where an extra polishing step is required (often on darker coloured cars), the amount of additional polishing required is significantly reduced, saving time and effort.
A few important points should be noted about the use of polishing compounds. Firstly, these products are designed to be used with machine polishers, and should not be applied by hand. This is because a very high work rate is required to break down the abrasive particles, and if they are not worked hard enough significant surface hazing will occur. Secondly, compounds are aggressive, particularly when used with cutting pads, and will remove paint more quickly than you might expect. We recommend practising on old panels and gaining experience prior to working on your own car. Thirdly, compounding should not be viewed lightly, and can only be done a certain number of times before the integrity of the clear coat is compromised. We therefore strongly recommend you save compounding as a last resort.
The next discernible group of products on the market are polishes, which vary in grade from medium abrasives to light abrasives. Like polishing compounds, most of the products in this category comprise uniformly sized abrasive particles that break down progressively as they are worked. However, in contrast to coarser polishing compounds, the finer abrasive particles in polishes require less work in order to break down, meaning that they can be applied either by hand or machine (although by machine is easier and gives better results). The purpose of polishes is to permanently remove less serious paint defects, such as minor swirl marks, fine scratches and light etching, and create smooth, highly reflective surfaces in readiness for the addition of wax or sealant protection. The benefit of modern abrasive technology means that once again it is now often possible to go straight from polishing using a medium abrasive to applying wax or sealant protection without the need for a further polishing step.
A few important points should be noted about the use of polishes. Firstly, some polishes on the market contain a small quantity of fillers, which help to mask any remaining defects prior to the application of wax or sealant protection. The downside of this is that once such fillers are eroded, some of the remaining defects will reappear. However, many other polishes on the market contain no fillers, meaning that the removal of defects is permanent (if you can't see them anymore they aren't there). Secondly, when working by hand it is beneficial to use the least abrasive product possible to get the job done. This is because polishing by hand is hard work, and much less effort is required to break down finer abrasives. In addition, when working by hand it is possible to inflict surface hazing when using medium abrasives, as you may not be able to break down the abrasive particles effectively. We recommend starting with a light abrasive and only moving onto medium abrasives if absolutely necessary.
Glazes are a seemingly misunderstood category of polishing products, perhaps because of confusion caused by the naming of certain products. In the true sense of the word, a glaze is a pure polish that does not contain any abrasives or cleaning agents. Glazes are designed to improve the brilliance and clarity of painted surfaces, and mask or visually reduce the extent of any remaining imperfections. In order to do this, glazes typically comprise mineral oils that enhance the wetness and richness of the finish, and kaolin (China Clay), which fills and hides minor swirl marks and other flaws. Somewhat confusingly, some glazes only contain mineral oils, meaning that they do not have any masking abilities, and some products that are called glazes actually comprise fine abrasive particles and solvent-based polishing agents, meaning that they are not glazes in the true sense of the word. We therefore recommend that you read product descriptions carefully before choosing an appropriate glaze.
A few important points should be noted about the use of glazes. Firstly, glazes are underused in the UK. In our opinion, it is far better to apply a glaze on a regular basis and hide any defects rather than polish your paint with abrasives on a regular basis. We only tend to polish our own cars with abrasive polishes once a year, and in the intervening period we use glazes to keep them looking good. Our reasoning for this is very simple - every time you use an abrasive polish you remove a further fraction of your clear coat. Do this too often and you risk compromising the integrity of your clear coat. Keeping daily drivers looking good is hard, but glazes offer a convenient solution that avoids the risk of over polishing. Secondly, once a glaze is applied you should apply wax or sealant protection immediately, in order to seal in the fillers. Whatever you do, you should never apply any product containing solvent-based cleaning agents over a glaze, as the fillers and the oils will be stripped away.
The final discernible group of polishing products on the market are cleaner-waxes, which blur the line between abrasive polishes and last step products, as they polish and lay down a layer of wax or sealant protection in a single step. Almost all of the products in this category utilise solvent-based cleaning agents instead of abrasive particles, meaning that they have limited polishing powers but excellent cleaning abilities. However, new products are set for release over the coming year that will utilise abrasive particles for the polishing process, meaning that more serious defects will be able to be corrected. Despite their limited polishing powers, such products can reduce the visual extent of defects quite effectively. This is because they tend to round off the edges of fine scratches, robbing sunlight of the ability to produce reflections and thus define the defects. These one step style products are great time savers, and perfect for enthusiasts who want to polish their paint lightly by hand whilst simultaneously adding protection.
A few important points should be noted about the use of cleaner waxes and other similar one step style products. Firstly, they should not be used over glazes, because their solvent-based cleaning agents strip away oils and fillers, cancelling out the benefits of applying the glaze in the first place. Secondly, such products typically lay down a layer of wax or sealant protection and care should subsequently be taken to ensure that the last step product is compatible with this layer, as sealants should not be layered over carnauba waxes. The rule of thumb is that if the cleaner-wax lays down a layer of carnauba wax, then only a carnauba wax last step product should be applied on top. However, if the one step product lays down a layer of sealant, you can generally apply any type of last step product on top. If you are ever unsure about what can and can't be layered in terms of cleaner-waxes and last step products, please contact us and we will be happy to advise you accordingly.
Now that we have illustrated common forms of sub-surface defects and described the various types of polishing products available on the market, we should be able to determine what can and can't be achieved using different polishing methods. Let's start with polishing by hand, as this is the only option open to car care enthusiasts who for whatever reason do not own a machine polisher. As stated previously, polishing by hand is not a waste of time, although it is fair to say that it is hard work, and the results that can be achieved are limited in comparison to polishing by machine. If you have any defects worse than minor swirl marks you will not remove them working by hand; the best you can hope to do is lessen their severity and then consider masking them prior to applying protection. Based on this, and the fact that polishing compounds should not be applied by hand, we can see that our attention should be focussed on minor defects and products falling into the polish, glaze and cleaner-wax categories.
In order to permanently remove minor swirl marks by hand, we recommend that you first try using a light abrasive polish. If after several applications some of the marks still persist, you can then move on to trying a medium abrasive polish. If you do this, you must work the area well, in order to help the abrasives break down. After several applications, we recommend finishing off with another application of a light abrasive polish, in order to remove any hazing and restore a perfect finish in readiness for wax or sealant protection. If you would rather try and hide defects instead of removing them, we recommend that you use a glaze containing fillers. Such products will also enhance the gloss of your paint in readiness for protection. If your paint is free of swirl marks but dull and lifeless, we recommend that you use a cleaner-wax to deep clean the paint and lay down an initial layer of wax or sealant protection.
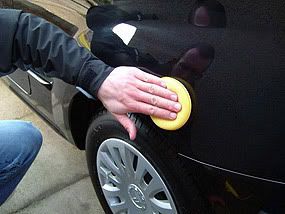
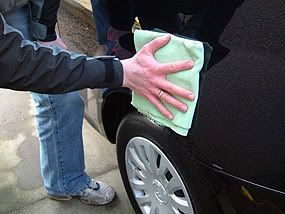
When it actually comes to polishing by hand, the first thing you should do is ensure the paint is clean and dry - wash your car first and then clay it if surface contaminants are evident. We recommend that you apply polishes by hand using either a good quality foam applicator pad or a microfibre applicator pad. The former tends to be better for applying glazes and cleaner-waxes, whereas the latter is better employed when using abrasive polishes, as the microfibre affords additional bite that helps the polishing process. Whichever you use, always remember to use a fresh pad for each product - you should never mix products. A common myth about polishing by hand is that you should only work back and forth and side to side, rather than in circles. We recommend that you try to work in all directions, because this will help to ensure that the edges of defects are rounded off evenly. Working in circles will not create new swirl marks unless you finish too quickly and do not allow sufficient time for the abrasives to break down. A good indication of this is a change in the appearance of the polish - many appear to become more transparent when they have been properly worked. Polish residues are often quite stiff, and removal requires firm buffing with a suitable microfibre towel. Plush towels with a short nap are ideal for this, as they are kind to the finish yet have sufficient bite to lift residues with ease.
Polishing by machine opens up more possibilities in comparison to polishing by hand, as products can be worked much harder and for much longer with ease. For example, the most popular dual action polisher on the market has a maximum working speed of 6000 orbits per minute. It is impossible for a human being to replicate this work rate - just imagine trying to polish a panel in a circular motion 6000 times a minute for 5 minutes or more, all the time applying constant pressure! Because the work rate is also selectable, machine polishers can be used to safely tackle all forms of paint defects, ranging from minor swirl marks to very deep scratches. The only proviso is that the clear coat must be intact before starting, and must not be reduced to less than 50% of its original thickness as a result of polishing. A further benefit of polishing by machine at high work rates is that painted surfaces can be burnished to an exceptionally high lustre prior to the application of wax or sealant protection - the same quality of finish is very hard to achieve when working by hand.
Although machine polishing offers many advantages over working by hand, it also adds more complexity to the polishing process. This is because additional choices have to be made with regard to machine type and pad selection. These choices are critical, because if you get them wrong it is very easy to damage your paint - machine polishers can remove paint surprisingly quickly if not used correctly. Let's start with the choice of machine type. Machine polishers fall into one of two camps - rotary or dual action. Rotary polishers are the choice of professional detailers. As the name suggests, the polishing head rotates around a fixed point at speeds of 0-2000 rpm. This circular action creates a lot of friction that can be used to great advantage when correcting major paint defects. However, the downside of this is that is it also very easy to inflict damage in the form of burn marks, buffer trails and excess paint removal. Mastering the art of rotary polishing takes a lot of practice, and for this reason we do not recommend it unless you seek professional training first.
Dual action polishers work differently to rotary polishers, in that the polishing head oscillates randomly about a fixed point as the polishing head spins (hence the term dual action). What this means is that friction is vastly reduced at any given point of contact, limiting the effective work rate and greatly reducing the risk of burning the paint or removing too much of the clear coat. Because of this, dual action polishers are ideal for car care enthusiasts who want to be able to safely correct their paint without the fear of inflicting further damage. A common myth is that dual action polishers are much less effective than rotary polishers. Whilst it is true that very serious paint defects can often only be fully corrected by rotary polishing, it is also true that dual action polishing can usually correct all but the most serious of defects. The major difference is the time taken to make the correction - a job that might take 20 minutes with a rotary polisher may take an hour or more with a dual action polisher due to the lower effective work rate, but in most cases the end result will be the same. Now we can see why it pays the professional detailer to master the art of rotary polishing, and why dual action polishing is the safe alternative for car care enthusiasts.
The most popular dual action machine polisher on the market is the Porter Cable 7424, which has now been around for over a decade and continues to be the number one choice of many car care enthusiasts. Porter Cable is a US company, and unfortunately the 7424 unit has yet to be granted CE certification, meaning that it cannot be legally sold in the UK. However, it is perfectly legal to import one for personal use, and the only adaptation that is required is the fitting of a UK plug and the purchase of a 110v transformer. We have imported several 7424 units over the course of the last year, and in each case we have purchased from Autopia, as they offer excellent customer service, competitive pricing and fast delivery. The key benefits of the 7424 unit are as follows. Firstly, it has a powerful 110v motor that generates working speeds in the range of 2500-6000 orbits per minute, all fully selectable via a thumbwheel. Secondly, at just under an inch, the long throw of the oscillation action significantly reduces rotational friction, meaning that the unit can be safely used at high speeds without any fear of burning the paint. Thirdly, the standard sized 5/16-24 spindle allows backing plates and accessories to be changed quickly and easily. Fourthly, popularity of the unit has generated a vast market for pads and accessories for all types of polishing tasks.
Pad selection is another critical choice when polishing by machine. All pads designed for use with dual action polishers are made from varying grades of high quality foam. The firmness of the foam dictates its suitability for different polishing tasks (compounding, polishing, glazing) and is usually colour coded to make recognition easier (unfortunately manufacturers use different colour schemes, so always read product descriptions carefully). Compounding pads are made from the firmest foams and are usually either orange or yellow in colour. The firmness of the foam allows the pad to cut into the surface of the paint (they are often called cutting pads) - pads falling into this category are aggressive, and should be used with great care. Polishing pads are made from foams of intermediate firmness, and are usually white in colour. These pads have a very slight cutting action that allows them to correct most defects without removing too much paint. Glazing pads are made from softer foams, and are usually either black or blue in colour. These pads have no cutting action, but are capable of burnishing paint to an exceptionally high lustre. The softest foams are used to make pads for applying last step products, and these are usually red in colour.
In addition to the firmness of the foam, pad designs also vary in size and shape, ranging from small, flat pads to large, variably contoured pads. Small 4" spot pads are designed to be used with 3.5" backing plates, and serve two main purposes. Firstly, they allow access to awkward areas, such as around grills and wing mirrors. Secondly, they allow specific defects, such as scratches, to be worked harder, as their size means they spin faster, doing more work. Their size also means that less surrounding paint is affected during the process of scratch removal. Larger 6.5" and 7.5" pads are designed to be used with 6" backing plates, and are perfect for general polishing tasks and working on larger panels. In the past, pads were always flat, but recent advances in design and technology have resulted in the release of shaped pads onto the market, which are easier to control and which reduce the amount of sling on start up. The most advanced pads currently available feature variable contour and constant pressure technologies, which provide greater flexibility in the form of multiple polishing faces, and yet more safety in the form of foam layers that help to keep the polisher level during use (and thus reduce the risk of inflicting buffer trails).
Now that we have examined the choices surrounding machine polishing, we should be able to determine safe approaches to defect correction. In all cases, the first thing you should do is ensure the paint is clean and dry - wash your car first and then clay it if surface contaminants are evident. In order to correct serious paint defects, such as severe swirl marks and widespread deep etching, we recommend that you first try using a polishing pad in conjunction with a medium abrasive polish. This combination can be worked hard at high speed without fear of removing too much of the clear coat. If after several applications the defects still persist, you may want to consider swapping over to a cutting pad and a polishing compound. However, such action should not be taken lightly, and ideally only if you are experienced at machine polishing. If you decide to proceed, always work in a well lit area, check your progress after every pass, and keep the working speed below 4500 orbits per minute. Once you have removed the defects, check the quality of the finish. If you can see any hazing you will need to conduct another polishing step, this time using a polishing pad in conjunction with a light abrasive polish. We recommend that the same combination is used to tackle less severe paint defects such as minor swirl marks and fine scratches. If after several applications the defects still persist, you can then try a medium abrasive polish (applied using a fresh polishing pad - you should never mix products on the same pad). The pattern you should see emerging here is simple - always use the least aggressive product you can to get the job done, and always match your choice of pad to the task in hand. The process becomes more straightforward if your aim is to simply mask any remaining defects or burnish the finish in preparation for wax or sealant protection - simply use a glazing pad in conjunction with a suitable glaze.
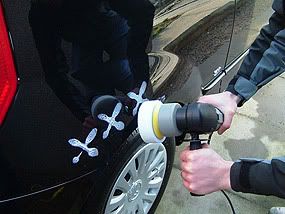
When it comes to the actual polishing process, the technique is similar whether working large areas or specific defects. In the case of the former, the first thing you should do is mask off all trims using low tack masking tape. This is because it is hard to avoid running onto trims when using 6.5" ands 7.5" pads, and failure to cover them often results in staining that is difficult to remove. The second task is to choose a suitable pad and product combination for the task in hand. Then you should fit the side handle and 6" backing plate to your polisher, press the pad in place (make sure that you do not rest the pad on the ground at any point) and connect the electricity supply. We recommend using an RCD safety device and an extension cable, so as to allow all panels to be easily reached. Now you are ready to start polishing. Before you do, you should prime the pad - this means adding a little lubricant to the pad, so that dry buffing is avoided before the product has time to spread. The easiest way to prime a pad is to mist it once or twice with either water or a quick detailing spray. The next thing to do is apply the product to the pad in an X shape, as this allows the product to spread out evenly across the pad when the machine is started.
With the pad primed and loaded, the next thing you should do before switching on is spread the product across the work area by pressing it repeatedly against the panel - this helps to ensure that all parts of the work area are evenly polished. Try to work whole panels at a time, starting on a panel featuring the defects you want to correct (this allows you to quickly determine if your choice of pad and product is going to achieve the desired result). With the pad held against the paint, you can now switch the machine on. We recommend that you read the instructions supplied with the machine before you first use it, paying particular attention to the section on safe working practices. When you start polishing, you should spend the first couple of minutes on a low speed setting (2-3 on the dial of a 7424) applying only light pressure, in order to allow the product to spread out evenly across the pad and the work area.
After a couple of minutes, you should turn the speed up (4-5 on the dial of a 7424) and then move systematically across the panel, applying moderate pressure. Slow, overlapping passes are ideal - there is no need to move the machine backwards and forwards or side to side. Different products need different amounts of work before they are ready to be removed, and knowing when this is the case only comes with practice (although a good rule of thumb is that most allow you to go over whole panels slowly at least 3-4 times). However, a good indication is a change in the appearance of the product - many appear to become more transparent when they have been properly worked. You should always stop the machine with the pad held against the paint. Many product residues are quite stiff, and their removal often necessitates firm buffing with a suitable microfibre towel. Plush towels with a short nap are ideal for this, as they are kind to the finish yet have sufficient bite to lift residues with ease. Once the residue is removed you should inspect the panel and repeat the process if defects still persist.
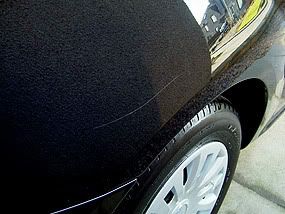
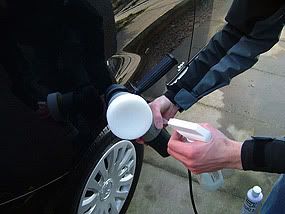
When polishing out specific defects, such as serious scratches, the technique is essentially the same, but the choice of pad will differ. In the following example, we will demonstrate how we removed a nasty scratch that appeared on the rear quarter panel of our C2 after we left it in a supermarket car park for a few hours. To remove a specific defect like a deep scratch, it is better to use a 4" spot pad, as they spin faster, do more work and affect less surrounding paint. In this case the scratch wasn't deep enough to catch a fingernail, so we were confident we could safely remove it by lowering the level of the surrounding clear coat. After setting the machine up and fitting a 3.5" backing plate and a 4" polishing pad, we primed the pad with a shot of quick detailing spray and then loaded it with a medium abrasive polish. We then spread the polish evenly over the work area by pressing the pad against the panel repeatedly.

Now ready to start polishing, we held the pad against the paint and turned the machine on, using a low speed setting (2 on the dial). We moved the pad over the work area applying only light pressure for a minute or so, in order to allow the product to spread out evenly across the pad and the work area. Then we increased the speed (4-5 on the dial) and began to move systematically back and forth across the work area, applying moderate pressure. After a few minutes the product started to turn transparent, so we switched the unit off with the pad held against the paint and then buffed off the residue with a suitable microfibre towel. Whilst this first application greatly lessened the severity of the scratch, it was still clearly visible. We then repeated the process, this time applying firm pressure and using the machine on the highest speed setting (6 on the dial). After the product once again began to turn transparent, we turned the machine off and buffed off the residue. Close inspection revealed that only the faintest trace of the scratch remained, so instead of repeating the process we decided to apply a glaze and then reapply multiple layers of sealant protection.

The final step in the polishing process is to pack away all of the tools you have used, making sure everything is clean and ready for the next use. All towels and applicator pads should be washed in a washing machine at a low temperature using a gentle non-biological liquid detergent (avoid soap powders and detergents containing bleach or fabric softeners), before allowing everything to dry out naturally. All polishing pads should be scraped off using a blunt plastic edge and then rinsed out thoroughly before being left to soak overnight in a bucket of warm soapy water - a good squirt of washing up liquid is ideal for this purpose, as it cuts through most product residues with ease and does not damage the foam. On the following day, the pads should be rinsed out thoroughly and then left to dry out naturally.
The polishing step is often skipped by many car care enthusiasts. This may be because they do not fully understand what purpose it serves, or because they are not confident enough to try it, or because they believe it requires special tools. As a result, many are left dissatisfied with the appearance of their paint. In this guide, we will attempt to shed some light on the subject of polishing by (i) illustrating common sub-surface paint defects, (ii) describing the different types of polish available on the market, (iii) demonstrating how to polish paint by hand and (iv) demonstrating how to polish paint by machine.
What do we mean by sub-surface defects? Sub-surface defects are any form of damage that penetrates the top layer of paint on your car, and include swirl marks, scratches, stone chips, water spots and etching caused by bug remains and bird droppings. By far the most common form of sub-surface defect are stone chips, particularly on bonnets and wings. However, many paint finishes also suffer from swirl marks and etching, and scratches are almost guaranteed if you park in supermarket car parks on a regular basis. Another less common form of defect are buffer trails, which are lines of swirl marks inflicted by poor machine polishing technique. All of the common forms of defects are shown in the images below.
Stone chips and scratches are obvious types of defect whose cause is clear, but what about swirl marks, water spots and etching? What are they, and how are they caused? Swirl marks are circular patterns of very fine scratches that resemble the form of cobwebs (they are often referred to as cobwebbing). They are nearly always the result of poor washing technique, and are virtually guaranteed to be inflicted if you use automatic car washes (those rotating bristles aren't as soft and gentle as they look). The other classic cause of swirl marks are traditional yellow sponges, as they provide no means of lifting particles of dirt safely away from painted surfaces when they are being washed. Instead, dirt particles are held on the face of the sponge and moved around over the underlying surfaces, creating fine scratches.
Water spots may form on painted surfaces when tap water is used to rinse off suds and then left to dry off naturally. The spots themselves comprise calcium carbonate, or limescale as it is more commonly known, and other salts. If such deposits are left on painted surfaces for any significant length of time, they can harden to the point where they become difficult to remove, even by machine. In extreme cases, such deposits can attack underlying surfaces, causing etching. Etching refers to chemical erosion of the top layer of paint (more often than not a clear coat), and is also caused by the corrosive effects of organic acids in bug remains and bird droppings. Such contaminants should always be removed as quickly as possible in order to minimise the risk of etching.
Can all sub-surface defects be corrected by polishing? Sadly, the answer is no. Critical to this issue is the depth of the defect in relation to the paint system. Most modern paint systems are made up of three layers; a basecoat of primer, then a layer of flat colour, and finally a topcoat of clear lacquer, commonly referred to as the clear coat. The clear coat on many modern cars is often two to three times as thick as the underlying colour layer, and is designed to enhance the appearance of the finish as well provide protection. Most sub-surface defects usually only affect the clear coat, and can often be fully corrected by polishing. However, if the defect has penetrated the clear coat and exposed the colour layer or the primer, polishing will not help, and may even make matters worse. In these cases, your only option is a trip to the bodyshop. In our experience, most stone chip damage falls into this latter category. A good test of whether a defect can be corrected by polishing is the fingernail test; if you run your fingernail over a defect and it catches, the chances are it is too deep to be corrected by polishing alone.
How can defects be corrected? Defects in the clear coat can be corrected in one of two ways. Firstly, you can lower the level of the clear coat in the vicinity of the defect by aggressive polishing until the defect is no longer visible. In general, it is safe to remove up to 50% of the thickness of the clear coat - any more and you risk paint system failure. The benefit of this technique is that the defect is permanently removed, but the downside is that such action can compromise the integrity of the clear coat, particularly if undertaken on a regular basis. The second option is to lessen the severity of the defect by gentle polishing, and then hide or mask it before applying protection. This is undoubtedly a safer option, but the downside is that the correction is only temporary - whatever you use to fill the defect will eventually be eroded, making it visible again.
In addition to the choices given above, you also have the option to work by hand or machine. Polishing by hand is not a waste of time, although it is fair to say that it is hard work, and the results are limited. If you have any defects worse than minor swirl marks you will not remove them working by hand; the best you can hope to do is lessen their severity and then consider masking them prior to applying protection. Machine polishing opens up greater possibilities, both good and bad. Whilst it becomes possible to fully correct even quite serious defects, it equally becomes possible to remove your clear coat in a short space of time. If you go down the road of machine polishing, do your homework, follow the advice laid out below and allow sufficient time to practice and gain experience.
Now we can start to see why some people are daunted by polishing. Not only can we tackle defects in different ways, but we can also use different methods. If this level of choice wasn't bad enough, we now have to add in a third factor; that of product selection. It is no surprise that many car care enthusiasts are put off and confused by the polishing process, for there are literally dozens of different polishes available on the market, all named and marketed in different ways. However, when you look past the choice and the labels, four main categories of polish appear, and these categories are the key to really understanding polishing, as they unify all of the other options outlined above. For this reason, we will now consider these four categories of polish, namely compounds, polishes, glazes and cleaner-waxes, before moving on to look at polishing techniques in more detail.
Polishing compounds are the most aggressive type of polishes on the market, and are used to correct major paint defects, such as severe swirl marks, and restore dull, neglected paint. Polishing compounds work by physical abrasion, and should be thought of as liquid sandpaper. Many modern polishing compounds comprise uniformly sized abrasive particles that break down progressively during the polishing process. This contrasts with traditional polishing compounds, in which the abrasives did not break down at all during the polishing process, and which left surface hazing that required further polishing steps with increasingly finer abrasives until a high gloss finish was restored in readiness for protection. The benefit of modern abrasive technology is that it is now often possible to go straight from compounding to applying wax or sealant protection without the need for intervening polishing steps. In cases where an extra polishing step is required (often on darker coloured cars), the amount of additional polishing required is significantly reduced, saving time and effort.
A few important points should be noted about the use of polishing compounds. Firstly, these products are designed to be used with machine polishers, and should not be applied by hand. This is because a very high work rate is required to break down the abrasive particles, and if they are not worked hard enough significant surface hazing will occur. Secondly, compounds are aggressive, particularly when used with cutting pads, and will remove paint more quickly than you might expect. We recommend practising on old panels and gaining experience prior to working on your own car. Thirdly, compounding should not be viewed lightly, and can only be done a certain number of times before the integrity of the clear coat is compromised. We therefore strongly recommend you save compounding as a last resort.
The next discernible group of products on the market are polishes, which vary in grade from medium abrasives to light abrasives. Like polishing compounds, most of the products in this category comprise uniformly sized abrasive particles that break down progressively as they are worked. However, in contrast to coarser polishing compounds, the finer abrasive particles in polishes require less work in order to break down, meaning that they can be applied either by hand or machine (although by machine is easier and gives better results). The purpose of polishes is to permanently remove less serious paint defects, such as minor swirl marks, fine scratches and light etching, and create smooth, highly reflective surfaces in readiness for the addition of wax or sealant protection. The benefit of modern abrasive technology means that once again it is now often possible to go straight from polishing using a medium abrasive to applying wax or sealant protection without the need for a further polishing step.
A few important points should be noted about the use of polishes. Firstly, some polishes on the market contain a small quantity of fillers, which help to mask any remaining defects prior to the application of wax or sealant protection. The downside of this is that once such fillers are eroded, some of the remaining defects will reappear. However, many other polishes on the market contain no fillers, meaning that the removal of defects is permanent (if you can't see them anymore they aren't there). Secondly, when working by hand it is beneficial to use the least abrasive product possible to get the job done. This is because polishing by hand is hard work, and much less effort is required to break down finer abrasives. In addition, when working by hand it is possible to inflict surface hazing when using medium abrasives, as you may not be able to break down the abrasive particles effectively. We recommend starting with a light abrasive and only moving onto medium abrasives if absolutely necessary.
Glazes are a seemingly misunderstood category of polishing products, perhaps because of confusion caused by the naming of certain products. In the true sense of the word, a glaze is a pure polish that does not contain any abrasives or cleaning agents. Glazes are designed to improve the brilliance and clarity of painted surfaces, and mask or visually reduce the extent of any remaining imperfections. In order to do this, glazes typically comprise mineral oils that enhance the wetness and richness of the finish, and kaolin (China Clay), which fills and hides minor swirl marks and other flaws. Somewhat confusingly, some glazes only contain mineral oils, meaning that they do not have any masking abilities, and some products that are called glazes actually comprise fine abrasive particles and solvent-based polishing agents, meaning that they are not glazes in the true sense of the word. We therefore recommend that you read product descriptions carefully before choosing an appropriate glaze.
A few important points should be noted about the use of glazes. Firstly, glazes are underused in the UK. In our opinion, it is far better to apply a glaze on a regular basis and hide any defects rather than polish your paint with abrasives on a regular basis. We only tend to polish our own cars with abrasive polishes once a year, and in the intervening period we use glazes to keep them looking good. Our reasoning for this is very simple - every time you use an abrasive polish you remove a further fraction of your clear coat. Do this too often and you risk compromising the integrity of your clear coat. Keeping daily drivers looking good is hard, but glazes offer a convenient solution that avoids the risk of over polishing. Secondly, once a glaze is applied you should apply wax or sealant protection immediately, in order to seal in the fillers. Whatever you do, you should never apply any product containing solvent-based cleaning agents over a glaze, as the fillers and the oils will be stripped away.
The final discernible group of polishing products on the market are cleaner-waxes, which blur the line between abrasive polishes and last step products, as they polish and lay down a layer of wax or sealant protection in a single step. Almost all of the products in this category utilise solvent-based cleaning agents instead of abrasive particles, meaning that they have limited polishing powers but excellent cleaning abilities. However, new products are set for release over the coming year that will utilise abrasive particles for the polishing process, meaning that more serious defects will be able to be corrected. Despite their limited polishing powers, such products can reduce the visual extent of defects quite effectively. This is because they tend to round off the edges of fine scratches, robbing sunlight of the ability to produce reflections and thus define the defects. These one step style products are great time savers, and perfect for enthusiasts who want to polish their paint lightly by hand whilst simultaneously adding protection.
A few important points should be noted about the use of cleaner waxes and other similar one step style products. Firstly, they should not be used over glazes, because their solvent-based cleaning agents strip away oils and fillers, cancelling out the benefits of applying the glaze in the first place. Secondly, such products typically lay down a layer of wax or sealant protection and care should subsequently be taken to ensure that the last step product is compatible with this layer, as sealants should not be layered over carnauba waxes. The rule of thumb is that if the cleaner-wax lays down a layer of carnauba wax, then only a carnauba wax last step product should be applied on top. However, if the one step product lays down a layer of sealant, you can generally apply any type of last step product on top. If you are ever unsure about what can and can't be layered in terms of cleaner-waxes and last step products, please contact us and we will be happy to advise you accordingly.
Now that we have illustrated common forms of sub-surface defects and described the various types of polishing products available on the market, we should be able to determine what can and can't be achieved using different polishing methods. Let's start with polishing by hand, as this is the only option open to car care enthusiasts who for whatever reason do not own a machine polisher. As stated previously, polishing by hand is not a waste of time, although it is fair to say that it is hard work, and the results that can be achieved are limited in comparison to polishing by machine. If you have any defects worse than minor swirl marks you will not remove them working by hand; the best you can hope to do is lessen their severity and then consider masking them prior to applying protection. Based on this, and the fact that polishing compounds should not be applied by hand, we can see that our attention should be focussed on minor defects and products falling into the polish, glaze and cleaner-wax categories.
In order to permanently remove minor swirl marks by hand, we recommend that you first try using a light abrasive polish. If after several applications some of the marks still persist, you can then move on to trying a medium abrasive polish. If you do this, you must work the area well, in order to help the abrasives break down. After several applications, we recommend finishing off with another application of a light abrasive polish, in order to remove any hazing and restore a perfect finish in readiness for wax or sealant protection. If you would rather try and hide defects instead of removing them, we recommend that you use a glaze containing fillers. Such products will also enhance the gloss of your paint in readiness for protection. If your paint is free of swirl marks but dull and lifeless, we recommend that you use a cleaner-wax to deep clean the paint and lay down an initial layer of wax or sealant protection.
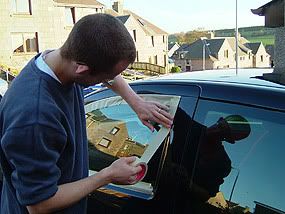
When it actually comes to polishing by hand, the first thing you should do is ensure the paint is clean and dry - wash your car first and then clay it if surface contaminants are evident. We recommend that you apply polishes by hand using either a good quality foam applicator pad or a microfibre applicator pad. The former tends to be better for applying glazes and cleaner-waxes, whereas the latter is better employed when using abrasive polishes, as the microfibre affords additional bite that helps the polishing process. Whichever you use, always remember to use a fresh pad for each product - you should never mix products. A common myth about polishing by hand is that you should only work back and forth and side to side, rather than in circles. We recommend that you try to work in all directions, because this will help to ensure that the edges of defects are rounded off evenly. Working in circles will not create new swirl marks unless you finish too quickly and do not allow sufficient time for the abrasives to break down. A good indication of this is a change in the appearance of the polish - many appear to become more transparent when they have been properly worked. Polish residues are often quite stiff, and removal requires firm buffing with a suitable microfibre towel. Plush towels with a short nap are ideal for this, as they are kind to the finish yet have sufficient bite to lift residues with ease.
Polishing by machine opens up more possibilities in comparison to polishing by hand, as products can be worked much harder and for much longer with ease. For example, the most popular dual action polisher on the market has a maximum working speed of 6000 orbits per minute. It is impossible for a human being to replicate this work rate - just imagine trying to polish a panel in a circular motion 6000 times a minute for 5 minutes or more, all the time applying constant pressure! Because the work rate is also selectable, machine polishers can be used to safely tackle all forms of paint defects, ranging from minor swirl marks to very deep scratches. The only proviso is that the clear coat must be intact before starting, and must not be reduced to less than 50% of its original thickness as a result of polishing. A further benefit of polishing by machine at high work rates is that painted surfaces can be burnished to an exceptionally high lustre prior to the application of wax or sealant protection - the same quality of finish is very hard to achieve when working by hand.
Although machine polishing offers many advantages over working by hand, it also adds more complexity to the polishing process. This is because additional choices have to be made with regard to machine type and pad selection. These choices are critical, because if you get them wrong it is very easy to damage your paint - machine polishers can remove paint surprisingly quickly if not used correctly. Let's start with the choice of machine type. Machine polishers fall into one of two camps - rotary or dual action. Rotary polishers are the choice of professional detailers. As the name suggests, the polishing head rotates around a fixed point at speeds of 0-2000 rpm. This circular action creates a lot of friction that can be used to great advantage when correcting major paint defects. However, the downside of this is that is it also very easy to inflict damage in the form of burn marks, buffer trails and excess paint removal. Mastering the art of rotary polishing takes a lot of practice, and for this reason we do not recommend it unless you seek professional training first.
Dual action polishers work differently to rotary polishers, in that the polishing head oscillates randomly about a fixed point as the polishing head spins (hence the term dual action). What this means is that friction is vastly reduced at any given point of contact, limiting the effective work rate and greatly reducing the risk of burning the paint or removing too much of the clear coat. Because of this, dual action polishers are ideal for car care enthusiasts who want to be able to safely correct their paint without the fear of inflicting further damage. A common myth is that dual action polishers are much less effective than rotary polishers. Whilst it is true that very serious paint defects can often only be fully corrected by rotary polishing, it is also true that dual action polishing can usually correct all but the most serious of defects. The major difference is the time taken to make the correction - a job that might take 20 minutes with a rotary polisher may take an hour or more with a dual action polisher due to the lower effective work rate, but in most cases the end result will be the same. Now we can see why it pays the professional detailer to master the art of rotary polishing, and why dual action polishing is the safe alternative for car care enthusiasts.
The most popular dual action machine polisher on the market is the Porter Cable 7424, which has now been around for over a decade and continues to be the number one choice of many car care enthusiasts. Porter Cable is a US company, and unfortunately the 7424 unit has yet to be granted CE certification, meaning that it cannot be legally sold in the UK. However, it is perfectly legal to import one for personal use, and the only adaptation that is required is the fitting of a UK plug and the purchase of a 110v transformer. We have imported several 7424 units over the course of the last year, and in each case we have purchased from Autopia, as they offer excellent customer service, competitive pricing and fast delivery. The key benefits of the 7424 unit are as follows. Firstly, it has a powerful 110v motor that generates working speeds in the range of 2500-6000 orbits per minute, all fully selectable via a thumbwheel. Secondly, at just under an inch, the long throw of the oscillation action significantly reduces rotational friction, meaning that the unit can be safely used at high speeds without any fear of burning the paint. Thirdly, the standard sized 5/16-24 spindle allows backing plates and accessories to be changed quickly and easily. Fourthly, popularity of the unit has generated a vast market for pads and accessories for all types of polishing tasks.
Pad selection is another critical choice when polishing by machine. All pads designed for use with dual action polishers are made from varying grades of high quality foam. The firmness of the foam dictates its suitability for different polishing tasks (compounding, polishing, glazing) and is usually colour coded to make recognition easier (unfortunately manufacturers use different colour schemes, so always read product descriptions carefully). Compounding pads are made from the firmest foams and are usually either orange or yellow in colour. The firmness of the foam allows the pad to cut into the surface of the paint (they are often called cutting pads) - pads falling into this category are aggressive, and should be used with great care. Polishing pads are made from foams of intermediate firmness, and are usually white in colour. These pads have a very slight cutting action that allows them to correct most defects without removing too much paint. Glazing pads are made from softer foams, and are usually either black or blue in colour. These pads have no cutting action, but are capable of burnishing paint to an exceptionally high lustre. The softest foams are used to make pads for applying last step products, and these are usually red in colour.
In addition to the firmness of the foam, pad designs also vary in size and shape, ranging from small, flat pads to large, variably contoured pads. Small 4" spot pads are designed to be used with 3.5" backing plates, and serve two main purposes. Firstly, they allow access to awkward areas, such as around grills and wing mirrors. Secondly, they allow specific defects, such as scratches, to be worked harder, as their size means they spin faster, doing more work. Their size also means that less surrounding paint is affected during the process of scratch removal. Larger 6.5" and 7.5" pads are designed to be used with 6" backing plates, and are perfect for general polishing tasks and working on larger panels. In the past, pads were always flat, but recent advances in design and technology have resulted in the release of shaped pads onto the market, which are easier to control and which reduce the amount of sling on start up. The most advanced pads currently available feature variable contour and constant pressure technologies, which provide greater flexibility in the form of multiple polishing faces, and yet more safety in the form of foam layers that help to keep the polisher level during use (and thus reduce the risk of inflicting buffer trails).
Now that we have examined the choices surrounding machine polishing, we should be able to determine safe approaches to defect correction. In all cases, the first thing you should do is ensure the paint is clean and dry - wash your car first and then clay it if surface contaminants are evident. In order to correct serious paint defects, such as severe swirl marks and widespread deep etching, we recommend that you first try using a polishing pad in conjunction with a medium abrasive polish. This combination can be worked hard at high speed without fear of removing too much of the clear coat. If after several applications the defects still persist, you may want to consider swapping over to a cutting pad and a polishing compound. However, such action should not be taken lightly, and ideally only if you are experienced at machine polishing. If you decide to proceed, always work in a well lit area, check your progress after every pass, and keep the working speed below 4500 orbits per minute. Once you have removed the defects, check the quality of the finish. If you can see any hazing you will need to conduct another polishing step, this time using a polishing pad in conjunction with a light abrasive polish. We recommend that the same combination is used to tackle less severe paint defects such as minor swirl marks and fine scratches. If after several applications the defects still persist, you can then try a medium abrasive polish (applied using a fresh polishing pad - you should never mix products on the same pad). The pattern you should see emerging here is simple - always use the least aggressive product you can to get the job done, and always match your choice of pad to the task in hand. The process becomes more straightforward if your aim is to simply mask any remaining defects or burnish the finish in preparation for wax or sealant protection - simply use a glazing pad in conjunction with a suitable glaze.
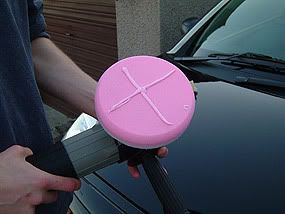
When it comes to the actual polishing process, the technique is similar whether working large areas or specific defects. In the case of the former, the first thing you should do is mask off all trims using low tack masking tape. This is because it is hard to avoid running onto trims when using 6.5" ands 7.5" pads, and failure to cover them often results in staining that is difficult to remove. The second task is to choose a suitable pad and product combination for the task in hand. Then you should fit the side handle and 6" backing plate to your polisher, press the pad in place (make sure that you do not rest the pad on the ground at any point) and connect the electricity supply. We recommend using an RCD safety device and an extension cable, so as to allow all panels to be easily reached. Now you are ready to start polishing. Before you do, you should prime the pad - this means adding a little lubricant to the pad, so that dry buffing is avoided before the product has time to spread. The easiest way to prime a pad is to mist it once or twice with either water or a quick detailing spray. The next thing to do is apply the product to the pad in an X shape, as this allows the product to spread out evenly across the pad when the machine is started.
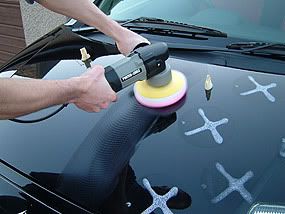
With the pad primed and loaded, the next thing you should do before switching on is spread the product across the work area by pressing it repeatedly against the panel - this helps to ensure that all parts of the work area are evenly polished. Try to work whole panels at a time, starting on a panel featuring the defects you want to correct (this allows you to quickly determine if your choice of pad and product is going to achieve the desired result). With the pad held against the paint, you can now switch the machine on. We recommend that you read the instructions supplied with the machine before you first use it, paying particular attention to the section on safe working practices. When you start polishing, you should spend the first couple of minutes on a low speed setting (2-3 on the dial of a 7424) applying only light pressure, in order to allow the product to spread out evenly across the pad and the work area.
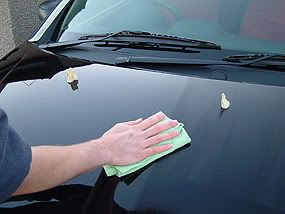
After a couple of minutes, you should turn the speed up (4-5 on the dial of a 7424) and then move systematically across the panel, applying moderate pressure. Slow, overlapping passes are ideal - there is no need to move the machine backwards and forwards or side to side. Different products need different amounts of work before they are ready to be removed, and knowing when this is the case only comes with practice (although a good rule of thumb is that most allow you to go over whole panels slowly at least 3-4 times). However, a good indication is a change in the appearance of the product - many appear to become more transparent when they have been properly worked. You should always stop the machine with the pad held against the paint. Many product residues are quite stiff, and their removal often necessitates firm buffing with a suitable microfibre towel. Plush towels with a short nap are ideal for this, as they are kind to the finish yet have sufficient bite to lift residues with ease. Once the residue is removed you should inspect the panel and repeat the process if defects still persist.
When polishing out specific defects, such as serious scratches, the technique is essentially the same, but the choice of pad will differ. In the following example, we will demonstrate how we removed a nasty scratch that appeared on the rear quarter panel of our C2 after we left it in a supermarket car park for a few hours. To remove a specific defect like a deep scratch, it is better to use a 4" spot pad, as they spin faster, do more work and affect less surrounding paint. In this case the scratch wasn't deep enough to catch a fingernail, so we were confident we could safely remove it by lowering the level of the surrounding clear coat. After setting the machine up and fitting a 3.5" backing plate and a 4" polishing pad, we primed the pad with a shot of quick detailing spray and then loaded it with a medium abrasive polish. We then spread the polish evenly over the work area by pressing the pad against the panel repeatedly.
Now ready to start polishing, we held the pad against the paint and turned the machine on, using a low speed setting (2 on the dial). We moved the pad over the work area applying only light pressure for a minute or so, in order to allow the product to spread out evenly across the pad and the work area. Then we increased the speed (4-5 on the dial) and began to move systematically back and forth across the work area, applying moderate pressure. After a few minutes the product started to turn transparent, so we switched the unit off with the pad held against the paint and then buffed off the residue with a suitable microfibre towel. Whilst this first application greatly lessened the severity of the scratch, it was still clearly visible. We then repeated the process, this time applying firm pressure and using the machine on the highest speed setting (6 on the dial). After the product once again began to turn transparent, we turned the machine off and buffed off the residue. Close inspection revealed that only the faintest trace of the scratch remained, so instead of repeating the process we decided to apply a glaze and then reapply multiple layers of sealant protection.
The final step in the polishing process is to pack away all of the tools you have used, making sure everything is clean and ready for the next use. All towels and applicator pads should be washed in a washing machine at a low temperature using a gentle non-biological liquid detergent (avoid soap powders and detergents containing bleach or fabric softeners), before allowing everything to dry out naturally. All polishing pads should be scraped off using a blunt plastic edge and then rinsed out thoroughly before being left to soak overnight in a bucket of warm soapy water - a good squirt of washing up liquid is ideal for this purpose, as it cuts through most product residues with ease and does not damage the foam. On the following day, the pads should be rinsed out thoroughly and then left to dry out naturally.